Updated version of my test image of the Lagoon Nebula (M8) with the first light of the ZWO ASI1600MM Pro camera and broad-band filters.
This image combines:
39 x 120s H-alpha (Baader 3.5nm ultra-narrow filter), in red. Darks and flats included.
40 x 15s OPTOLONG L-Pro filter, in green. No flat or darks.
28 x 300s [O III] 3 nm ultra-narrow Antlia filter, in green. Includes darks and flat (this image is the new addition).
56 x 6s ZWO B filter, in blue, no flat or dark.
H-alpha data taken on 21st Aug 2020, L-Pro and B data taken on 23rd Aug 2020, from my backyard at home, 15 km North from Sydney’s city center.
Telescope: Skywatcher Black Diamond 80, f=600mm (f/7.5)
Equipment: I used the ZWO ASIAir to control the camera, the mount (Skywatcher AZ-EQ6) and the guiding system (ASI120MM + Orion 50mm finderscope). ZWO filter drawer for changing filter.
The [O III] data taken on 18 August 2021, including the Orion 0.75x focal reducer and the ZWO 7×2″ filter wheel.
Processing: Data processed with Siril software. FITS converted on TIFF using NASA’s Fits Liberator considering a logarithmic function. Color / saturation / levels / contrast / smart sharpen with Photoshop.
Deep H-alpha image of the Prawn nebula (IC 4628) in Scorpius obtained from my backyard, 15 km from Sydney’s city centre.
This image combines:
56 x 900s (14h) frames with the H-alpha Baader 3.5nm ultra-narrow filter (red channel and luminosity layer).
25 x 60s (25 min) frames with the OPTOLONG L-Pro filter (green channel)
14 x 30s (7 min) ZWO B filter (blue channel).
Total integration time: 14h 32 min.
The data were taken on the nights of 24th, 25th, 28th, 29th and 30th August and 7th and 12th September 2020.
Telescope: Skywatcher Black Diamond 80, f=600mm, with an Orion x0.8 focal reducer (effective focal length 480 mm, f/6).
I used the ZWO ASIAir to control the camera, filter wheel, the mount (Skywatcher AZ-EQ6) and the guiding system (ASI120MM + Orion 50mm finderscope).
Equipment: ZWO ASI1600MM Pro cooled at -30 C. I used the ZWO ASIAir to control the camera, the mount (Skywatcher AZ-EQ6) and the guiding system (ASI120MM + Orion 50mm finderscope). The filters were manually changed using the ZWO filter drawer.
The data have been processed with SIRIL, then converted into TIF using Fits Liberator using a logarithmic stretch, and finally combined in Photoshop to get the colours and the final details.
Processing: Data processed with Siril software. Darks, flats and biases were used. FITS converted on TIFF using NASA’s Fits Liberator considering a logarithmic function. Color / saturation / levels / contrast / smart sharpen with Photoshop.
Article originally written for the AAO’s Newsletter published on 29th June 2021.
During the last year I’ve been setting up my telescope in the backyard to do astrophotography as an amateur astronomer. This has been possible thanks to getting a good mount (Skywatcher AZ-EQ6-Pro) that allows me to do auto-guiding, and using a little but very clever device (it’s a modified Raspberri Pi manufactured by ZWO called “ASIAir”) that allows me to connect mount and cameras (the main camera for astrophotography and the auxiliary camera for auto-guiding) together, being everything controlled using my son’s iPad (who, with only 8 years, has been also helping me with all of this). In the last months I’ve been able to get a process so smooth that I only need 10 minutes for setup (checking polar alignment, guiding, focus) and then the telescope is observing all the night (it will automatically move to a parked position at the end of the run).
My amateur telescope equipment in the backyard (15 km from Sydney’s centre) ready for astrophotography in April 2021. The telescope is my Skywatcher Black Diamond 80, f=600mm (f/7.5) that I bought for the Transit of Venus 2012. The x0.8 Orion focal reducer is included here. I use the ZWO ASIAir to control the main camera, the mount (Skywatcher AZ-EQ6 Pro) and the guiding system (ASI120MM + Orion 50mm finderscope). The ZWO Filter Wheel has 7 positions with 2” filters (ZWO LBGR filters, Baader 3.5nn H-alpha, Antlia 3nm [O III], and a hand-made dark filter). The main camera is a ZWO 1600MM-Pro, usually set at -20C.
I must confess this has been a lot of fun for me, also for keeping extra busy and awake during the many meetings / workshops in the middle of the night we all are having lately. I’m getting some nice photos, particularly of nebulae, as I’m using some ultra-narrow (3.5nm thickness) H-alpha and [O III] filters. One of my favourite images is the Cat’s Paw nebula, who would have told me just some few years ago I will be able to get such an image with all these details using a 80mm refractor telescope in Sydney!
Deep H-alpha image of the Cat’s Paw Nebula (NGC 6334) in Scorpius obtained from my backyard, 15 km from Sydney’s city centre. All the information in my Flickr. Credit: Ángel R. López-Sánchez (AAO-MQ).
Hence, when last May, I was starting to use TAIPAN and observing with this new instrument, I couldn’t help myself…
While Tayyaba and Anthony helped me to get trained for TAIPAN observing, I decided to check if the instrument could be used for observing HII regions in the outskirts of the nearby spiral galaxy M 83, as well as observing the dwarf galaxies in the neighbourhood. Unfortunately this has been hard for the 1.2m UKST because of the faintness of the targets, but at least I got some test data from the central parts of M83 and some dwarf galaxies, including beautiful starburst NGC 5253.
However, I was thrilled to be using TAIPAN to observe M83 while, at the same time, in my backyard, my small telescope was also observing M 83 to get a new color-image of this galaxy. It was quite exciting and rewarding!
Colour image of M83 and surroundings combining data in B, G, R and Luminosity filters (8 hours in total combining 2 minute exposures). Data taken on 16 and 17 May 2021 while observing with TAIPAN remotely from my home office. This is still work in progress. Credit: Ángel R. López-Sánchez (AAO-MQ).
This image is still work in process, because we need to take usually hundreds of frames in each filter to get a good astronomical image to mitigate the light pollution plus reducing the background noise as much as we can. And, of course, dealing later with the processing of the data (it’s not that hard as it sounds, there is actually some software already available for amateur astronomers that does this very quickly in a very efficient way, even considering darks, flats, offsets and median stacking with different options). Also, I still need to add the H-alpha data in this image to emphasise the star-forming regions in the spiral disk of M 83. Unfortunately, the weather over Sydney during the last weeks has not being very good for astrophotography, but I hope to get the rest of the data soon.
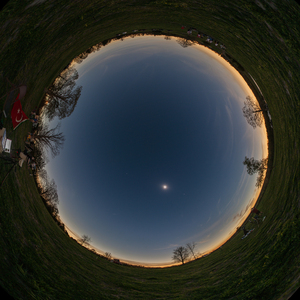
Additionally, on Wednesday 26th May we enjoyed a total lunar eclipse. I took almost 2000 images of the event while I was participating in an online live event with many schools in Spain (8000+ views during the day). The telescope setup in this case was different, as I used my CANON 5D Mark III DSLR as main camera attached to my telescope. But, even though the totality of this lunar eclipse was short (only around 15 minutes), I got a very nice image of the eclipsed moon. For this image I combined the same data independently for getting the stars and the moon, and merged them together later.
Total Lunar Eclipse on 26th May 2021. This image combines 50 x 1″ exposures, ISO 800, obtained with my CANON 5D Mark III attached at primary focus of my Skywatcher Black Diamond 80mm f600mm (F/7.5) during the Total Lunar Eclipse on Wednesday 26 May 2021, between 9:00pm and 9:04pm, Sydney local time. Full description and high resolution image here. Credit: Ángel R. López-Sánchez (AAO-MQ).
I didn’t want to miss getting a nice image of one of my all-time favourite nebulae, the Rosetta nebula, before it was too late in the season and moved into the west.
This image combines 15 x 60s exposures in each color channel, using broad-band filters B (blue), G (green) and R (red). I also tried to achieve natural colours (i.e. the colours we would see with our eyes).
The data were taken at 10:30pm, Sunday 15 March 2021, from Siding Spring Observatory (near Coonabarabran, NSW, Australia).
I used a ZWO ASI1600MM-Pro with the ZWO 2″ BGR filters, my new 7×2″ ZWO filter wheel, a Skywatcher Black Diamond 80mm with an Orion x0.8 focal reducer (effective focal length 480 mm, f/6). I used the ZWO ASIAir to control the camera, filter wheel, the mount (Skywatcher AZ-EQ6) and the guiding system (ASI120MM + Orion 50mm finderscope *).
The data have been processed with SIRIL, then converted into TIF using Fits Liberator using a logarithmic stretch, and finally combined in Photoshop to get the colours and the final details. Darks, flats and biases were used.
I usually try to get at least 30-40 frames per filter, but as I said this was a compromise to get a nice colour shot of this nebulae before it set, and hence I took 15 exposures per filter, and only 60 seconds (and the highest gain in the camera, hence the noise that can be seen when zooming in). Otherwise I would have taken ~5 minute exposures with a lower gain and 40 of them.
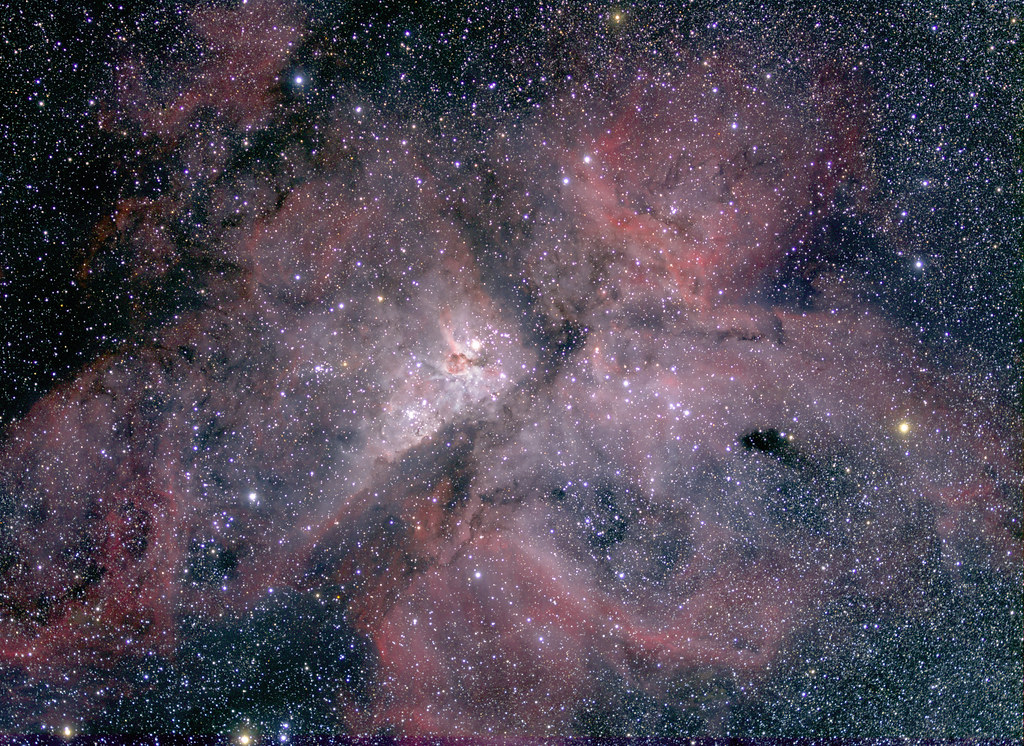
Image of the Carina Nebula using broad-band filters B (blue), G (green) and R (red), trying to achieve natural colours (i.e. the colours we would see with our eyes).
For avoiding saturating the brightest part of the nebula, only 10s exposures were taken, with a small “manual” (*) dithering pattern. 42 single frames were combined in each filter (7 minutes per filter).
The data were taken at around 3am, Saturday 13 March 2021, from Siding Spring Observatory (near Coonabarabran, NSW, Australia).
I used a ZWO ASI1600MM-Pro with the ZWO 2″ BGR filters, my new 7×2″ ZWO filter wheel, a Skywatcher Black Diamond 80mm with an Orion x0.8 focal reducer (effective focal length 480 mm, f/6). I used the ZWO ASIAir to control the camera, filter wheel, the mount (Skywatcher AZ-EQ6) and the guiding system (ASI120MM + Orion 50mm finderscope *).
The data have been processed with SIRIL, and then Photoshop for getting the colours. Darks were used but not flats were taken.
(*) Well, actually I didn’t use guiding: the ZWO ASIAir didn’t want to talk to the mount, and I had to reset the mount a couple of times because, after doing the 3-stars alignment, the solution was completely wrong, once it pointed me to the ground to go to Canopus! After 3 hours fighting, very tired and cold, I decided to do something quick at least for saving the night. This was it. I had to do the dithering manually moving slightly the telescope with the keypad every 3-4 exposures. Dithering is VERY important for removing extra noise / artefacts of the camera.
PS: The astrometry of the image can be found in this link. Well, actually I uploaded the previous version I quickly created, that had too much magenta. But I wanted to check a curious object in the image, V* FU Car, a carbon star with magnitudes V = 11.2 and G= 12.4 en G, meaning V-G = -1.2 mag!